The main job (to get started on at least) for today is pulling out the dash.
Before proceeding to that, I cleaned up a few more odds and ends around the gas tank and in the engine compartment.
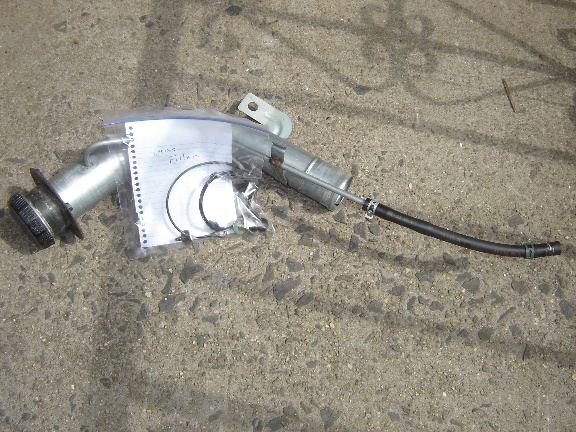
The fuel filler pipe.
A bracket and a rubber diaphram whose purpose eludes me. (Possibly a vapor barrier?) The fuel filler pipe runs through this before attaching to the tank.
Up front now, this is the coolant reservoir.
The next three shots show a bracket that holds the fuel filter, and which also retains a little plate with holes for cable stays.
The first in a series of clamps that hold the fuel lines. The ones after this also retain the brake line, so they have to stay.
The fuel lines, removed from the car.
The brackets that the radiator sits in.
A little oddity here. Someone had patched-in a little under-the-hood power supply plug.
Okay, now we're working on the dash. My dash seems to be very different from the one described in the Veloce shop manual. They said to start with the dash center panel. (Actually they said to start by disarming the airbags, but the battery has been unhooked for several weeks now, I think I'm safe.)
There are two screws that hold this frame at the bottom. The shop manual reports that there is another screw which one gains access to by removing the eyeball vents. I got them out by worming a screwdriver up behind them and prying back one of the plastic spring clips that retain them -- this seemed like a much better method than was prescribed by the manual: run a cord through the eyeball and pull them out forcibly. Once removed however there was no sign of those additional screw heads.
I finally realized that the frame is further retained only by plastic spring clip thingies, so I pulled it out.
Here's a few shots of the eyeball vents and how they're retained.
Little plastic covers on the side of the dash, behind which are two of the nine dash mounting bolts.
Returning to the manual, we want to pull the steering column next.
Five big fat electrical connectors to the wheel.
This is a two part plastic clamshell that conceals the mess right behind the wheel.
After a lot of contortionist-type action I got the 4 bolts that hold the steering column out. Since I was working underneath it I was careful not to let it fall out on my face, although I think having it fall down onto my throat may actually have been worse... Well, at least the damage isn't as visible.
The bottom of the steering shaft has a spline that a clamp from a universal joint, ummm, clamps. I loosened the bolt and pulled and pulled and pulled. Nothing.
Finally I took the bolt all the way out in order to be able to more effectively beat on the clamp. No beating was required, it just slid right out. Some clever designer had added a groove in the middle of the spline that the bolt engaged. At first I laughed, but some more thought leads me to think this is a good idea -- by making that connection more rigid it may help the shaft to collapse more readily in a crash.
A lot of electrical connectors are going to need to be unhooked. This one, for the side mirror adjusting gizmo, was the easiest to reach.
The stereo. I've just realized that this may be useless now. I'm not sure if I have the security code for re-initializing it after a power loss.
Started to clean up to leave, but got re-engrossed by the instrument panel. There is a soft cowl that surrounds and shades the instrument cluster. The manual says this is retained by two screws and some spring clips, but I haven't seen any screws. I wonder if it got changed to all spring clips. (By the way, it feels really odd to just grab a part of your car's interior and just yank as hard as you can on it -- kind of like you're intentionally TRYING to break something.) Yes, it was changed to all spring clips.
The cluster is held by 4 screws. Here is a view of the back, seen through the windshield.